Index
- Installation
- System settings
- User settings
- Working with WHFC
- Define job log
- Define a phonebook
- Technical Infos
- Using WHFC via ole
- Writing a language dll
Installation
![]()
![]()
![]()
![]()
Supported platforms
WHFC is currently tested under Windows 95, 98, NT 4.0,2000,XP. Windows NT 3.5 is not tested. It was compiled with Visual C++ 5.0 with service pack 3-6.
Needed components for Whfc
Before you start the installation, please make sure, that you have already installed the following components:
- For Windows 95 you need to download Winsock 2.0 from Microsoft.
- The dll odbc32.dll is needed (have a look in your system directory if it is there). If you don' have this dll please download the current odbc drivers (now called MDAC or Universal Data Access) from Microsoft.
- If you want the new fax viewing feature you need a viewer program which can handle the 2-D encoded tiff G3 format. On a first look on the internet i have foundtiffview which seems to work, but does not update the size in fine resolution correctly. Also check out the links page on www.hylafax.org for fax viewers.
Installation instructions
Via the Windows Setup Program
Unzip the downloaded file somewhere in a temporary directory. After unpacking you find two directories called disk1 and disk2. Go to disk1 and run there setup.exe (on Windows NT and Windows 2000 please install it as administrator).
After setting the program path and program group whfc and the regmon utility starts automatically. The regmon utility disappears after 2 seconds. Probably it claims, that it cannot find the whfcmon.dll. In this case you should start regmon.exe manually after the installation (it's a limitation of the free edition of Install Shield). On Whfc enter the System Preferences via the menu and specify the Hostname and Spool directory (see WHFC Installation on this page). If you have finished the setup, you have to setup your Fax Printer and if you need it a fax viewer solution.
If you install it on Windows 98 check the links in the program menu of Windows. These links may be broken. You have to correct this manually. On Windows 2000 you must add WHFC in the autostart group, since the automatic start via the fax printer port does not work.
If you upgrade :
There is a new field for the phonebook separator which defaults now to ; instead of comma . If you have old file dependent phonebooks and you don' need the comma in your dial string, set this field to comma. Otherwise the phonebooks are not compatible. If you need the comma for the dial string, replace it with an editor to ; .
Before you can upgrade the printermonitor you have to unregister the old printer monitor. To do this, choose an other port on your fax - printer (for example LPT1). Then start regmon.exe and click here on unregister.
Manually installing DLL's needed for the Faxprinter :
Get the archive for your system (Windows 95 or NT). Unpack this archive in a temporary directory. You will find whfcmon.dll and regmon.exe. On Windows 95 copy the dll to c:\windows\system if your windows directory is on drive c: On Windows NT copy the dll to c:\winnt\system32. Then start the program "regmon.exe". Click here on register. A message "monitor successful registered" should appear.
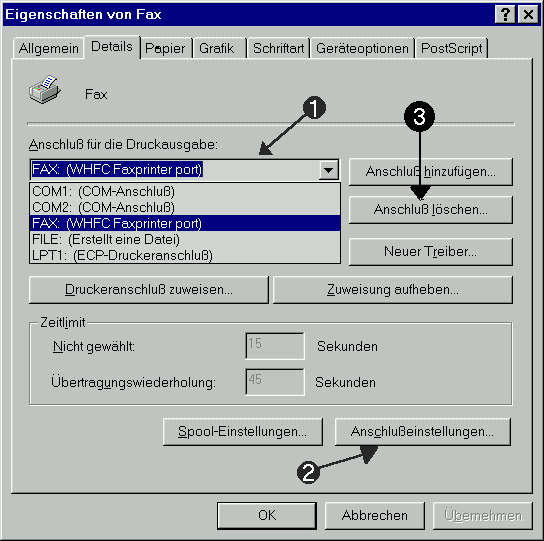
Go to the windows printer installation. Add a new printer. Choose here a local connected printer. It's important that you use a postscript driver. I recommend the "Apple LaserWriter 16/600" for NT or "Apple LaserWriter" for Windows 95. Connect this with the FAX: port (1) (this port is visible after registering it with regmon.exe). Then enter in the configure port dialog via "Configure Port" (2) and choose here a directory for the temporary spool files. For german users of Windows 95 i have added a picture of the printer dialog with the numbers on it, so you can see, which buttons i mean.
Copy whfc.exe somewhere on your hard drive if you haven' installed it via the Windows Setup Program.. Then start whfc. In the fax menu choose first "System preferences". Then provide entries for the two empty fields. These are:
- Hostname : Put the full domain name of your HylaFAX server here.
- Spool directory: Put the full path to the directory where messages will be spooled in offline mode.
Next choose "Define Phonebooks" from the Fax menu and select either File or ODBC, and provide the needed file name.
Now select "Fax" from the menu bar and then select "User preferences". As a minimum, you must enter your username. You will also be queried to enter a file name for the faxcover. The other fields can be filled in optionally. See the next pages for further information.
Activating passive connections and Coversheet-Info
As of version 1.0.9 you can enable passive ftp connections when setting the registry key HKEY_LOCAL_MACHINE\SOFTWARE\Whfc\UsePasv to 1. If you want active connection (default) set this key to 0.
With the registry key HKEY_LOCAL_MACHINE\SOFTWARE\Whfc\SendCoverSheetInformation you can control if WHFC sends the receiver-company, receiver-location and receiver-user to the HylaFAX server. Setting this key to 1 enables this feature, with 0 it's disabled (default).
Last updated: 03-Oct-2018 09:20